Trichrome (Three Color Separation Process)
The above image was shot on Fuji Neopan Acros, a standard black and white film stock. Yet, as is plainly visible, a full range of color has been reproduced. How? The oldest color-reproduction trick in the book — color separation. By recording a series of images (in this case, three), each containing a different isolated color element (which we might refer to as a channel), we get pieces of a whole that can be reconstructed to form a color image. Here, I’m using the logical combination of three primaries — red, green, and blue.
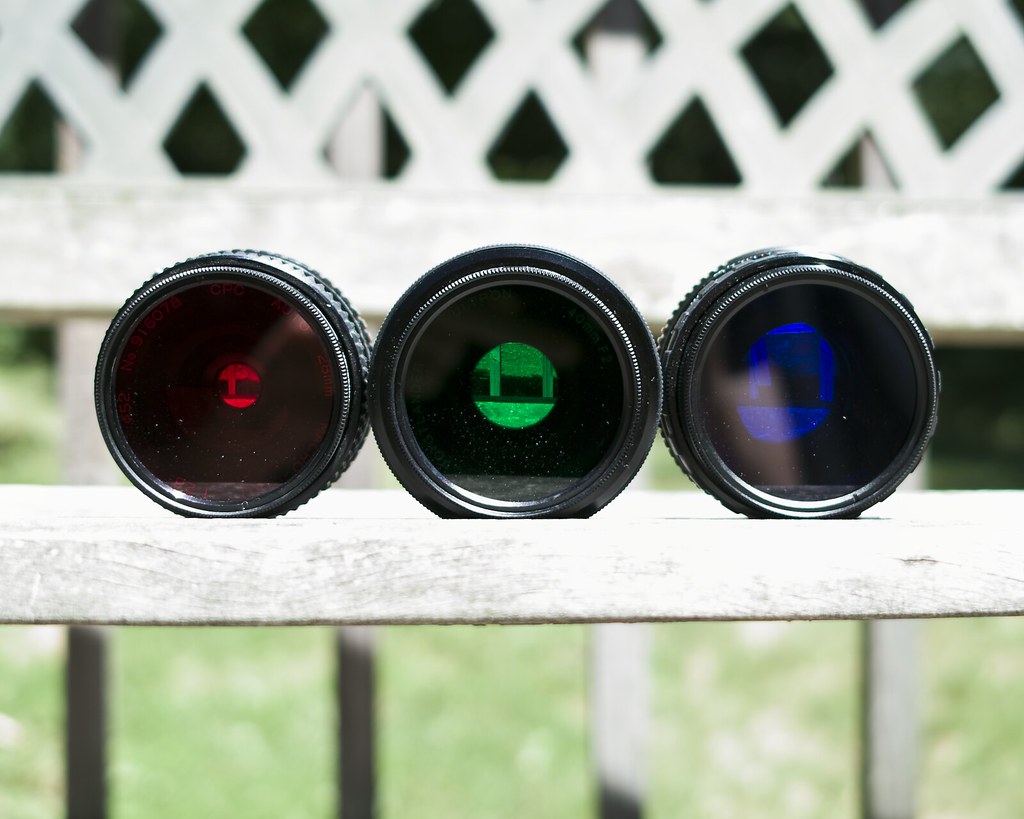
the three filters used in an rgb (trichrome) color separation photo.
Specifically, the three filters I’m using (seen above) are a Wratten 29 (red), a Wratten 61 (green), and a Wratten 47 (blue). I don’t think this is actually a perfect set — if memory serves, a deeper red would actually fit the green and blue better. But, getting filters in the odder Wratten numbers is tricky enough, and the 29, 61, 47 set works fine for my purposes. I’m using Tiffen filters, which are not necessarily the quality of B+W or Heliopan, but are affordable and, more importantly, available in a wide range of Wratten numbers. These filters are quite deep, and do rob the film of light — 3EV for the red, and —2.5EV for the green and blue.
a shadow present on only one of the three frames — in this case, green — turns out the inverse color.
Since the process involves shooting three frames, and attaching/detaching three filters, care must be taken to keep the camera stable. The sturdier the tripod, the better. I suppose this is one instance where having a motor drive might help, reducing the potential for camera movement during frame advance. I’ve had decent luck, however, with just a small Novoflex tripod, and a manually-advanced body. I never screw the filters on too tightly — each one will only be on for a single frame at a time anyway.
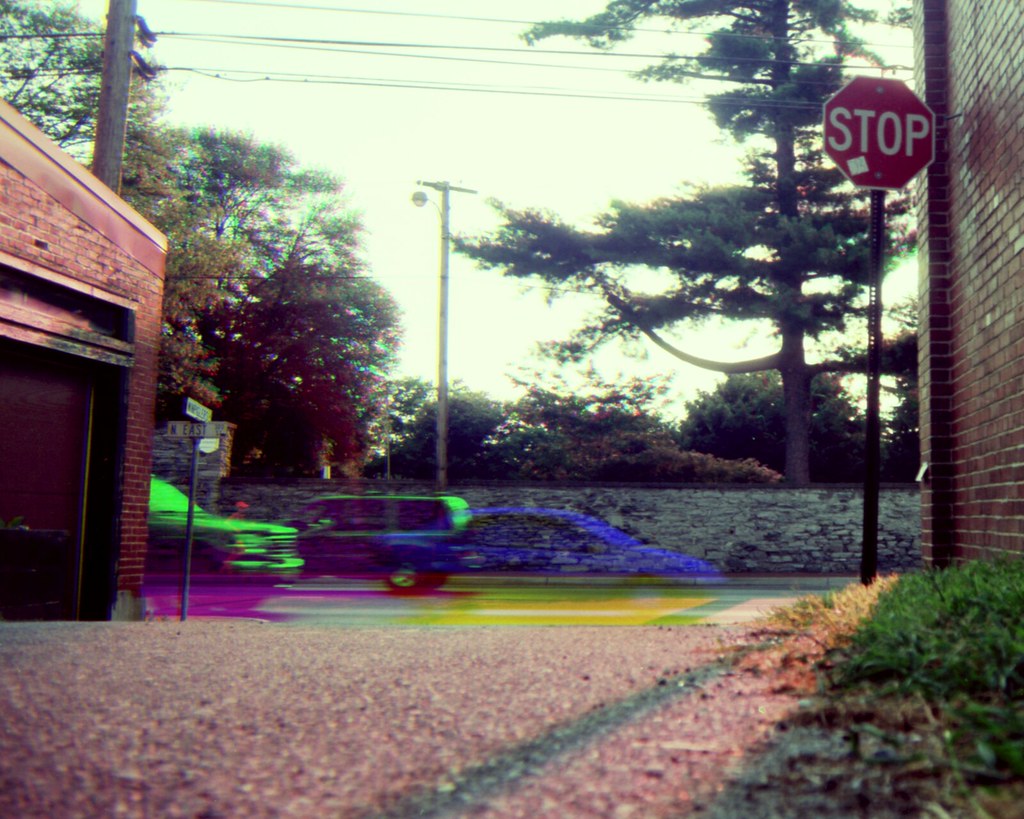
here, a person is visible on the red frame, a car on the blue, and two suvs on the green.
Since the filters are quite dark, I frame the shot before any of them go on. I meter while I’m framing, just to save time and energy after. For each shot, I compensate manually with the previously listed values. I always shoot them in order — red, then green, then blue — so that there’s no confusion afterward. Reconstructing the image in Photoshop is relatively simple. Bringing in all three layers is always the first step, and then either allowing Photoshop to auto-align them, or aligning them manually by viewing the differences of two at a time and adjusting accordingly. From there, the file can be converted from greyscale to RGB, and each layer reassigned to the corresponding channel. But, the method I prefer is to compensate for exposure and set each layer to screen over the next. I have a Photoshop Action just for this. Simply name the red layer ‘r,’ the blue layer ‘b,’ and the green layer ‘g,’ and the Action does the rest using Adjustment Layers for non-destructive behavior.

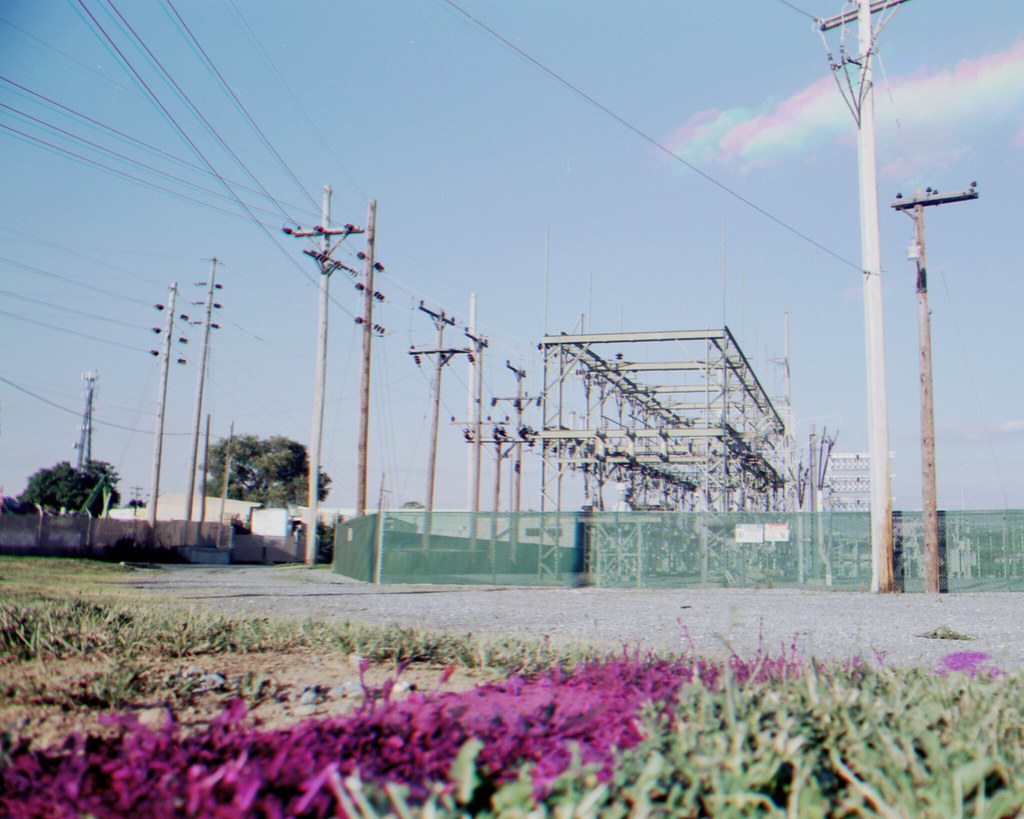
the three colored streams were created by adjusting water flow differently between each of the three filtered shots.
I guess the only thing left to address here is the matter of why.While home processing of color film has been made far more accessible recently, black and white is still cheaper, safer, and simpler. That’s kind of a cop-out reason due to the impracticality of trichrome photography — consider, for example, getting a human subject to stay still long enough for a crisp portrait. A more reasonable reason is simply that the temporal gaps between the three color channels leave plenty of opportunity for creative effects. Subjects moving in and out of frame will leave brightly colored ‘ghosts.’ Trees blowing in the wind will have multicolored glows about them. Water will shimmer prismatically and clouds will be like those from a dream. This is my reason — experimentation and a resultant image distanced yet further from reality.
While most b/w films are these days, it’s still wise to make sure you’re using panchromatic stock. Orthochromatic films like Efke lack sensitivity on the red side of the spectrum, and won’t do well for color reproduction. Be sure to check out the trichrome group on Flickr.
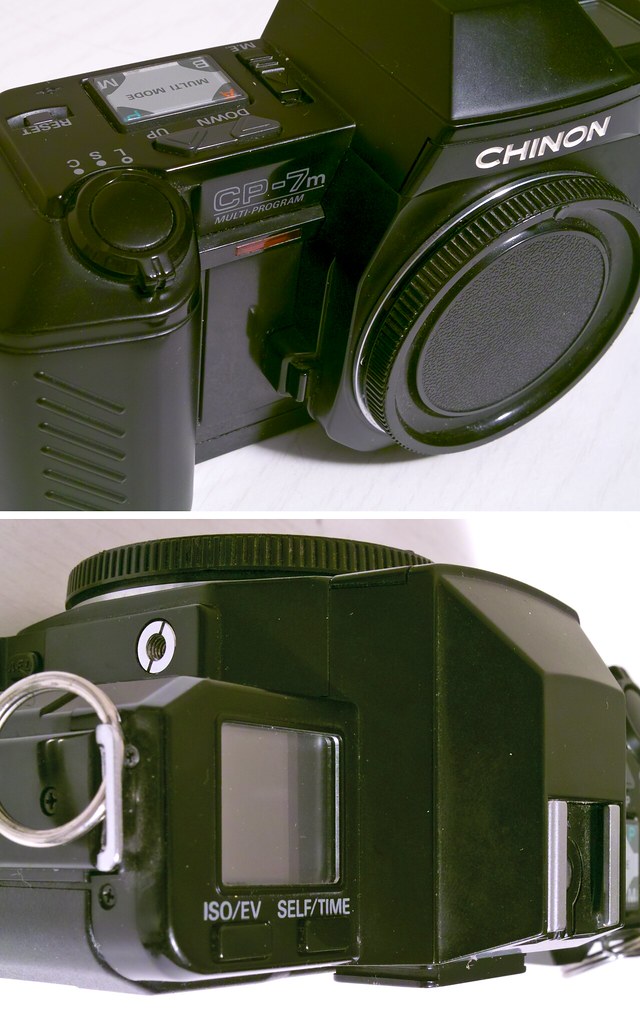
Chinon CP-7m
This photo is part of my photo reference set on Flickr. Detailed notes accompany the photo itself.
Chinon was never one of the major players in the photography game, their name not as recognizable as Canon, Nikon, or Pentax. But they made some very interesting bodies throughout the years, including the CP-X, CP-5, CP-6, CP-5s, CP-7m, and CP-9AF. All of these have some neat features, and one very interesting trick up their sleeves — the ability to operate in program mode with any K-mount lenses (not just lenses with A settings — in fact, they tend to underexpose with A lenses due to a change in the K mount spec). While I’m still hoping to find a bargain on one of the first four CP cameras in the list above, this write-up will deal with the CP-7m. The CP-9AF is identical, except that it has electrical contacts to communicate with a couple of primitive auto-focus lenses from Chinon. The CP-9AF also provides electronic focus confirmation with manual focus lenses, auto-bracketing, and TTL flash (with dedicated Chinon flash units).
The CP-7m has one feature which I really hate — inbuilt motor drive. I’ve only owned two other SLRs with motor drive, and it annoyed me on both of them as well. I never shoot continuously, and even the quietest of motor drives are far louder and more irritating than a manual advance. Motor driven cameras also require more power, and are generally bulkier. For these reasons, the CP-7m could never be my go-to camera. But, to use a tired cliché, the CP-7m is a bit of a Swiss Army Knife, with plenty of niche features that will have me grabbing for it at the bottom of the camera pile every now and again.
The first neat thing, for a night shooter like myself, is how the camera handles bulb mode. Bulb has its own dedicated mode (there’s a four-way mode switch, much like the typical PASM, but without shutter priority and with bulb we actually have a PABM) which is a nice UI decision. Unlike a lot of cameras from the era of how-many-electronics-can-we-cram-into-this-body, the CP-7m takes a standard, old-fashioned cable release, and thus does not require a costly, hard-to-find, proprietary release — already a good start for long exposures. In the basic bulb mode, the display on the left-hand side keeps a count of the length of the exposure. This is shown in second intervals up until 60 seconds, and then minutes until 90 minutes. In fact, anything related to time follows the same scheme, which will come up several more times in this write-up, so make a mental note — everything time related can be done up to 90 minutes, with one-second precision up to a minute and one-minute precision after. While in minute display, the minute indicator on the display blinks every second. Unfortunately, the display is not backlit, so this counter may not be too incredibly helpful at night (the aforementioned CP-5, etc., beep every five seconds for the first minute, and every minute after in bulb mode, probably handier at night). Still, keeping track of bulb exposures seems like a no-brainer, though many cameras lack it.
Aside from normal, hold-down-the-release bulb mode, the CP-7m also offers what Chinon describes as a time mode. This isn’t the traditional time mode wherein the shutter is hit once to open and again to close. Rather, this is an extended bulb mode where you can tell the camera how long you want the shutter to be left open. This essentially means that if you don’t need to meter, your shutter speeds run from 1/2000 second to 90 minutes. Pretty exciting. While in this mode, the display counts down from your set time, and the exposure is cancelable at any time.
a six minute exposure using the bulb timer built into the cp-7m.
The self-timer has the same time range as the bulb modes. This, by itself, is kind of silly — an hour and a half self-timer has pretty limited utility. But the trick is this — set the motor drive to continuous, add a locking cable release, and you have a rather flexible intervalometer. Interval shooting was the one reason I almost held onto my Pentax PZ-1, though using the feature on the PZ-1 was much more of an ordeal than on the CP-7m. The only real issue with interval shooting on the CP-7m is that since it’s based on a self-timer, there is no initial shot. That is, the first frame to fire fires after the determined interval. For most short intervals this won’t matter, and for most long intervals a shot can simply be fired before switching to interval mode. Still, this could be an issue. Continuous (and therefore interval) mode works with the multiple exposure feature as well, so interval shots can all be performed on a single frame if so desired.

‘self portrait over the course of an hour’ achieved by leaving the chinon in multiple exposure mode, and shooting six frames at ten minute intervals.
The last thing that I really appreciate about this camera, even if it’s a pretty minor thing, is the power source. If you’re going to make me load a camera up with batteries, it’s nice to have options. And, the CP-7m gives me two options without even needing a stupid external grip — 1 pricy 2CR5 or 4 easy-to-come-by AAs. I tested the body with Sanyo Eneloops, and it does work perfectly fine with the 1.2V nominal output of NiMh cells.
Aside from all the little things that make this camera really stand out, it has some perfectly good specs. Speeds on the vertical-travel shutter range from 1/2000 to 8 seconds, and sync is 1/125. User interface is uncluttered and logical (although the buttons have a mushy feel about them). Tripod thread and lens mount are both metal, despite the camera being overall a bit plasticky. The back is removable in the normal manner, though the manual makes no mention of other available backs. The take-up catch has a similar release, though I haven’t actually found what it does. The camera operates without the back on, which could be useful for some DIY projects, I suppose. The finder is not half-bad, offering shutter speeds and metering through a bar of LEDs, though no display of aperture. Focus aids include a horizontal rangefinder split surrounded by a relatively fine microprism collar. Film speed is set via DX, with manual override available (32-5000 ISO). When DX-coded film is used, the ISO button turned into an EV± button, and the display keeps a persistent warning when anything other than ±0EV is set. The meter is of the wonderfully responsive silicon blue variety, and is center-weighted. Finally, AE lock is available via a small button to the right of the lens.
I loaded my CP-7m up with a half-roll of Kentmere 100, and plan to try some long exposures and interval shots in the coming weeks. Results will be posted here and on flickr.
Check out the Chinon group on Flickr. There’s also a nice group dedicated to K-mount cameras of all sorts.
Cosina Voigtländer Ultron 40/2

This review is part of my photo reference set on Flickr. Clicking the photo above will take you to the photo page on Flickr, with pretty much the same review, but very detailed notes about each lens on the photo itself.
I recently picked up the Voigtländer Ultron 40/2 (seen left, above) to use as my primary lens on the Pentax MX. Smaller lens to go with a smaller body, naturally. 43mm is the standard focal length for 135 format photography — not 50mm (blame the folks in Wetzlar for that one). My favorite standard range primes have always been in 40-45mm. With this in mind, my options for a small prime were basically the Ultron, the old Pentax 40/2.8 pancake, or the Pentax Limited 43/1.9. The Limited is a beautiful lens, and I still want to get one some day, but it doesn’t seem much smaller than a normal Pentax standard, and I simply can’t afford it. The 40/2.8 pancake demands high prices, but it’s not the sharpest thing in the world… I still want to get one some day, because it’s tiny, but not until I find a good deal.
cosina voigtlander ultron 40/2, pentax mx, fuji neopan acros 100
The Ultron is larger than a pancake, but smaller than a standard Pentax prime. Feel of the focus is the best I have felt on any lens I have ever touched, hands down. Aperture is the same terrible combination of full- and half-stop clicks as a genuine Pentax lens. The aperture ring is a bit smooth, and takes some getting used to. Lens is solid and heavy; heavier than the Pentax 50/2. Image quality is excellent, the lens is insanely sharp edge-to-edge. It does exhibit more distortion than I would expect (at both the focal length and the price point), but this is generally not noticeable, and correctable in post.
cosina voigtlander ultron 40/2, pentax mx, kodak panatomic-x 32
A few final observations: The CV uses aspheric elements… I do not know if these are plastic, hybrid, or glass. I doubt glass, due to cost. I doubt plastic due to weight. So, I have to guess hybrid. CV only includes a Leica-sized lens cap, to go on the hood. This cap is incredibly thick, plus the addition of the hood, and your small lens just got considerably beefier. I use a slim Pentax (F?) edge-squeeze type cap instead. The CV has 9 curved aperture blades, which results in round bokeh at any setting. If you value sunstars over decent bokeh, I guess this lens isn’t for you — personally, I’ll take the bokeh. Speaking of bokeh, while it won’t look horrifically polygonal on this lens, it does get a little ringy and is not necessarily my favorite. Optical design is 6 elements (one aspheric) in 5 groups on the Ultron, 5 in 5 on the 50/2, 5 in 4 on the 40/2.8 pancake, and 7 in 6 on the 43/1.9 Limited.